Showing posts with label kite making. Show all posts

Tuesday, May 2, 2017

Session with TARC Students

A group of Tunku Abdul Rahman University College students seek my assistance to educate them on how to make a traditional malay kite; particularly Wau Bulan. This was to fulfil their academic requirement in the Islamic and Asian Civilisation Course at the College.


I was obliged to assist and invited them for a session at home on 30th March recently. 

They were a group of young, energetic and enthusiastic students whom I see a lot of potentials; the future of which this country lies. 

The session is incomplete without tea ... 

... and a photo

Wednesday, October 26, 2016

4 Div Wau Making Workshop 13 Sep 15

I took the opportunity to impart the knowledge of how to make wau and how to conduct a wau flying competition in view of conducting a Wau Flying Competition in my organisation. It was conducted at Kepong Metropolitan Park Kuala Lumpur. The outing was very successful.


Side activity: Kite Flying


Side Activity: Traditional Wau Making


Grading


Adjusting the Bridle


The Judging of the Wau Flight


Up, Up


And Away....


The Victor


The Victors


Monday, March 2, 2015

20th Pasir Gudang World Kite Festival 2015

My latest accomplishment was the National Champion in the Creative Kite 3D category. The theme for the competition was "Anniversary". The kite that I constructed was a three layered cake.

It is a combination of a ring and box kite concept made of ripstop sail and fibreglass rods.


Monday, January 23, 2012

Wau Bulan: Keystone Kiters Winter Retreat, Camphill, Pennsylvania, USA

The Keystone Kiters, through Kevin and Cinda Shannon, invited me to share my knowledge on making the Wau Bulan for their winter kitemaking retreat of which I was very obliged to accept it. But the biggest problem that confronted me was where was I going to get the materials? I haven't seen any Bamboo clumps around in Pennsylvania and even if there is, I cannot be sure if it would be suitable for making kites. And there were host of other materials that were needed which may or may not be the same and subtituted.

Making a traditional kite is not as same as the modern kite. The rituals relating to the Bamboo as highlighted in my earlier postings have to be observed. The process of making the Wau frames alone may take several days. If a decorated Wau Bulan is to be made, the process of preparing the sail alone may take weeks. So, I decided on a simple one day program. My aim is to expose the participants on the technical aspects of making a Wau Bulan and send them home with a homework to complete the decorated sail (of which I cannot guarantee that they will complete it). Nevertheless, in order to make sure that they will not go back empty handed, I call for DIY Kits to be flown from home all the way to the US. Hence, the Wau Bulan making winter retreat was successfully conducted on January 22, 2012 at Camphill Borough Hall, Pennsylvania.

For all of the participants, this was to be their first at working on a Wau Bulan. However, their skills and mastery in kitemaking had helped them to quickly adapt to making a Wau Bulan. Following are the evidences of their labour, patience and success. Credit to Cinda Shannon who had worked very hard to prepare for the retreat but was unable to be with us during the conduct of it.


Tuesday, September 27, 2011

2011 Keystone Kiters August Retreat, Camphill, Pennsylvania, USA


At the outset, I wish to express my regret for not being able to update this blog as regular or as soon as I should. I meant to tell you that I had the opportunity to visit the 2011 Keystone Kiters August Retreat which was held from 26-28 August 2011 at Camphill Borough Hall, Pensylvania, USA.
This year, the summer kite making project is a Gizmo kite, an original design featured by presenter Simon Crafts of Vanlue, Ohio. It is an 8 feet kite that uses design elements from many other kites like stone mountain, genki, flare and Tri-D Box.
I thank Cinda Shannon for inviting me to the retreat and all the participants who were warm to accept my presence. Below are pictures of the kite and the participants at work.

Saturday, April 16, 2011

Making a Wau: Trimming the Bamboo Techniques

1. Trimming the bamboo for making the frames of a wau is an important aspect in Wau making. It will determine whether the frame is strong enough to take strong wind or flex enough to fly during light wind condition.

2. Before trimming the bamboo, one must establish on the conditions the Wau is to be flown. Even in a small country like Malaysia, the wind conditions is different depending on the time of the year and the location where the Wau is flown e.g. at the beach or inland.


3. There are a couple of techniques that a skilled Wau maker used to trim a bamboo. The simplest and easiest technique is as pictured above. The steps are as follows:


a. Cut the bamboo strip to the length required ensuring that there is a node in the centre and the culm length on either side is of the same length to ensure balance.


b. Split the bamboo near to the size required so that lesser trimming job is needed.


c. Sit on the floor or a stool; whichever is more convenient.


d. Place a piece of rag on the lap (left or right depending) so that it will not cause abrasion or spoil your pants.


e. Hold the bamboo strip at the centre node with one hand and the trimming knife on the other.


f. Decide the amount of bamboo to be trimmed by adjusting the angle of the cutting edge of the trimming knife and the amount of force to be exerted. Note that the steeper the angle of the cutting edge of the trimming knife and the greater the force applied will trim the greater amount of bamboo.


g. While holding the trimming knife static, draw the split bamboo against the cutting edge of the trimming knife.


h. Adjust the angle of the cutting edge and the amount of force as required. Roll the bamboo regularly so that a near cylindrical pencil like is achieved; tappering towards the end. Do not remove the bamboo skin as it will reduce the strength of the bamboo.


i. Regularly change trimming the left and right side of the centre node so that there is balance.


j. Repeat the process until you have achieved the desired size and flex.


4. Trimming a bamboo require skill but it is not too difficult to acquire. Practise will make perfect.


5. Split bamboo is sharp. Handle with care and take precaution. Happy trimming.


Sunday, April 10, 2011

Making A Wau: Dealing with the Bamboo

The bamboo forms the main component of the frame of a Wau. A good type of bamboo will determine the quality of a Wau. Most literature about making Wau in the Malay culture would give you the following pointers to select and prepare the bamboo: Selecting the Bamboo

a. Preferably select Bambusa Blumenea - Buluh Duri, Dendrocalamus Asper - Buluh Betung or Gigantochloa Spp - Buluh Brang.
b. The bamboo clump selected must be located on high and spacy ground.

c. Select an old and seemingly dry bamboo that is located in the centre of the clump.

d. Select the bamboo pole that is leaning towards sunrise as it is belief to have high spirit.

e. Determine the length and the spot where the bamboo is to be cut to ensure that the node is in the centre, and the culm on each side of the centre node is about the same length. The length of the bamboo must cater for the longest part the Wau e.g. the lower tailpiece of a Wau Bulan.
f. Cut the bamboo on the afternoon of a dry spell so that the water contents of the bamboo is lowest.

g. Avoid cutting bamboo with sheaths or young shoots as it is still young and has high sugar contents in its sap that is prone to pest attacks.

NB: If you are making the Wau for pleasure, DO NOT get bogged down with the above pointers. ANy type of bamboo from the nursery, hardwares or DIY stores with the desired thickness, length and flex will meet the requirement.


Treating the Bamboo
a. Traditionally, newly cut bamboo pole is submerged underwater (or mud) for weeks. The aim is to bleach the sap which attracts pests.

b. The bamboo is then placed under indirect sunlight for slow drying. Sometimes, it is smoked. The aim is to dry and to eliminate the sugar content in the bamboo.

NB: Unless you intend to keep the Wau for years, there NO need for you to treat the newly cut bamboo. For normal use, the newly cut bamboo can be split and dry out in the sun so that it can be used quickly. Turn over the split bamboo while drying so that it gets dried evenly and avoids bent.
Trimming the Bamboo
a. The bamboo is cut to the desired length. A four feet Wau span may require a 54 inches long bamboo strip to allow for the arch and bend.
b. Split the bamboo from the smaller end, to near required size so that trimming job is lessened.

c. Trim the bamboo using appropriate trimming knife. Alternatively, use a paper cutter. It is not easy to trim a bamboo. On the same note, it is not difficult either. But be extra careful.


NB: The upper part of the spine of the Wau is stiff but the lower tail part is flexible. The bamboo strip for the spine is comparatively bigger than that meant for the wing. The center part of a bamboo strip for the wing of a four feet Wau is nearly pencil-like size, and the tip of the bamboo is nearly that of a matchstick. The size of the bamboo strip for the tail is much smaller than that of the wing.

Wednesday, April 6, 2011

Types of Wau: Wau Bulan (Moon Kite)

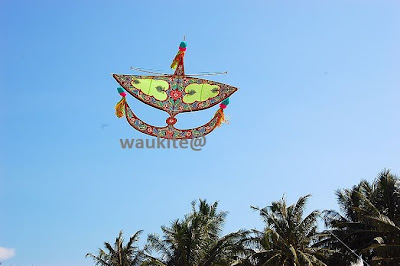
Wau Bulan is a buzz word in Malaysia's traditional kite's world. Perhaps, you landed at this blog because you too search for 'Wau Bulan". Therefore, it is imperative that I blog on this subject at the onset. I will not dwell into history at this point of time. There are so much uncertainties and myths with regards to the origin of Wau Bulan.

Wau Bulan literally means Moon Kite. It derives its name from the shape of its tail that looks like a crescent. It is the most stable Malaysia's traditional kite and an easy flyer suitable for light and moderate wind condition. As a single liner and a flat kite, strong wind will cause instability. A suitable size of a Wau Bulan for recreational flying purposes is a four footer (about 1.2 m). Smaller is unstable and bigger gives much drag, unless you are a seasoned kitesperson; the more drag, the greater the fun.


Like any other traditional kites of Malaysia, the frame of Wau Bulan is made of bamboo strips. The purpose of the Wau will determine the type of material and the extend of the decorations. A Wau meant for display is made of glossy flint coloured papers and will be decorated elaborately; but is too heavy to fly. A Wau meant for recreational flying is made of kite papers with only light decorations, or with a more durable materials like plastics sheets or ripstop nylon fabrics.


However, at national competitions, both beauty and flight performance were considered, and the materials used are limited to those of a traditional Wau only. Therefore, it is up to the Wau-Maker to strike the balance between the decorations and the weight of the Wau. There have been innovation in the construction of a Modern Wau Bulan. This is due to the need of bigger Wau to capture spectator's attention; but at the same time is easily assemble and dismantle. In this context, the use of modern kite materials such as carbon rods and ripstop nylon fabrics come into play. I am among those who subscribe to the innovative idea and have won several awards at national competitions in that category.

The 10 footer Wau Bulan The Launch The Pull The Flight The Reading The Victory!

Tuesday, April 5, 2011

How To Make a Malay Kite

This is a Malay Kite Fighting Competition. The idea is to cut off other participants' kite string. Whichever kite remains the last in the air will emerge as winner. Note that the kite string is standard, issued by the organizer.
This is a Malay Kite or known as Wau Kikik in Malay. It is a tailless diamond-shaped kite. History states that this is among the earliest kite design in the East. It is similar to Eddy Kite or Holland Kite. A Malay Kite is the easiest kite to make. It is an easy flyer provided that it is light, big enough and well balanced. Pictured above is a 3 feet Malay Kite. It is the standard used in the national Malay Kite Fighting Competition.


The vertical stick is the spine. It should be slightly stronger than the cross stick. The cross stick which is just slightly longer is attached to the spine (ensure the balance) by a string at a quarter distance from the top. Then tie the strings at the end of the spine and the cross stick to make the shape. Reinforce with another smaller diamond shaped in the center with a string to provide support to the sail and the frame. Glue on the sail. The sail could either be of kite paper, plastic sheet or the modern ripstop nylon fabric. Attach one point of the bridle where the sticks crossed and another point of the bridle slightly short of the bottom tip of the kite. Finally, attach a kite string and you are Ready To Fly (RTF).